Modifier Stack for Maya Documentation
Install Modifier Stack for Maya, add and reorder modifiers, use sub-object levels and instancing, and fix common problems.
Requirements
Maya 2025, 2026 or 2027. Tested in Maya 2025 and 2027. Maya 2026 runs the same Python as 2025.
Install
Pick one of the two ways.
A. Drag and drop (recommended)
- Unzip the whole download.
- Start Maya and drag
ModifierStack_drag_and_drop_install.pyinto a viewport.
Modifier Stack opens, its STACK button goes on the LP Tools shelf, and it gets an entry in the LP Tools menu. Click the button to open the panel. It docks, and it remembers where you docked it. One install covers Maya 2025, 2026 and 2027. In another version, the button appears the first time you start it.
To remove it, choose LP Tools menu > Modifier Stack > Uninstall.
B. By hand, with two lines of Python
- Copy
lp_modifier_stack.pycfromModifierStack\python\py311(Maya 2025 or 2026) orModifierStack\python\py313(Maya 2027) into your Maya scripts folder,Documents\maya\scripts. - Restart Maya, then run these lines in the Script Editor (Python tab):
import lp_modifier_stack
lp_modifier_stack.show()
To make a shelf button, select the lines and middle-mouse-drag them onto a shelf.
Update
Drag ModifierStack_drag_and_drop_install.py from the new download into Maya. It replaces the old version, including a copy you put in your scripts folder by hand. If you installed by hand, replace the file in Documents\maya\scripts and restart Maya. Your settings are kept either way.
A quick tour
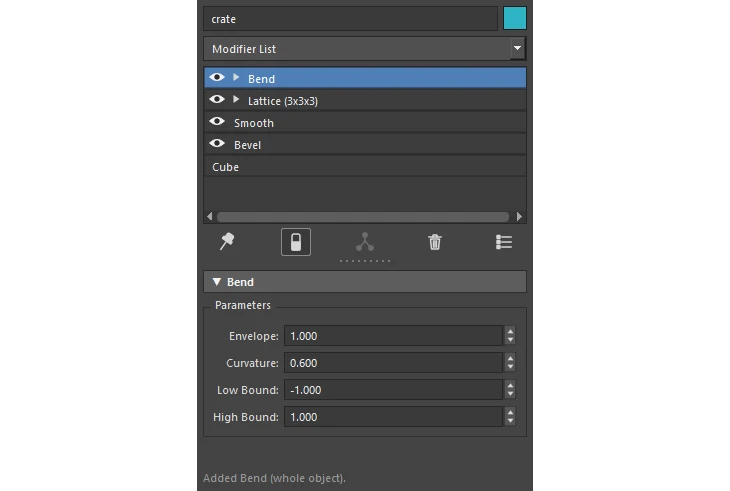
- Modifier List: pick a modifier to add it above the selected row, or on top when no row is selected. Selected faces, edges or vertices limit it to those.
- The stack: the eye switches a modifier off, the arrow opens its sub-object levels, and dragging a row reorders it. Italics mark instanced modifiers. The bottom row is the base object.
- Toolbar: Pin Stack, Show End Result, Make Unique, Remove Modifier and Configure.
- Rollout: the selected modifier’s settings, or the base object’s creation settings. A Cube shows its Width, Height, Depth and subdivisions.
- Right-click a row for Copy, Paste, Instance, Make Unique, Collapse and more.
Everything it does
- The stack: the eye switches a modifier off, dragging a row reorders it, and Show End Result previews the whole stack while you edit a lower row.
- Modifier List: about 30 mesh operations and deformers, A to Z. Type a letter to jump. Selected faces, edges or vertices limit the new modifier to just those.
- Modifier set buttons: make named sets of your favorite modifiers and show them as one-click buttons.
- Max-style spinners: drag the arrows to change a value (Ctrl faster, Alt slower, one undo per drag) and right-click to reset. Keyed values show red brackets and get a new key when Auto Key is on.
- Sub-object levels: Vertex, Edge, Border Edge, Face and Shell on the mesh (keys 1 to 5), plus Handle on Bend, Twist and the other nonlinear deformers, Lattice Points, Cluster Pivot and projection manipulators.
- Instancing: add a modifier to several objects at once and they share it. Paste Instanced, Make Unique and Copy Entire Stack are included.
- Collapse: collapse to here or collapse all, the same as deleting history up to that point.
- Base object settings: select the bottom row to edit the original creation settings, such as a Cube’s width, height, depth and subdivisions.
Spinners
Spinners work like 3ds Max’s. Drag the arrows up or down (Ctrl for faster, Alt for slower). A whole drag is one undo step. Click the arrows to step, and right-click to reset. Right-click during a drag to cancel. Keyed values show red brackets and get a new key when Auto Key is on.
Sub-object levels
The active level is yellow. Click it again, or pick another row, to leave it.
| Row | Levels |
|---|---|
| Mesh (no history), Tweak | Vertex, Edge, Border Edge, Face, Shell (keys 1 to 5 while the stack has focus) |
| Bend, Twist, Flare, Squash, Sine, Wave, Texture Deformer | Handle |
| Cluster | Handle, Pivot |
| Lattice | Lattice Points, Lattice |
| Planar Mapping, Cut Faces | Manipulator |
Working with several objects
With several objects selected, deformers are made once across all of them with one handle. Other modifiers are made per object and linked as instances. The stack lists only the modifiers every selected object shares. Reordering, renaming, collapsing and Show End Result need a single object.
Included modifiers
Bend, Twist, Flare, Squash, Sine, Wave, Lattice (2x2x2, 3x3x3, 4x4x4), Cluster, Texture Deformer, Blend Shape, Bevel, Extrude, Smooth, Mirror, Soften Edge, Reduce, Reverse Normals, Triangulate, Average Vertices, Move Vertex, Fill Hole, Merge Vertices, Delete Faces, Cut Faces, Lock Normals, Planar Mapping and Automatic Mapping. History made by other tools, such as Tweak and Skin Cluster, shows up in the stack too.
Troubleshooting
The STACK button isn’t on the shelf. One install covers Maya 2025, 2026 and 2027, but in a version other than the one you dragged the file into, the button appears the first time you start the tool there. Dragging the install file into that version also works.
Reordering broke a modifier. Modifiers that store component numbers can break when you reorder them. Press Ctrl+Z to undo it.
A modifier I added ended up on top of the stack. Maya numbers faces, edges and vertices on the final mesh. A modifier made from selected components lands on top when a topology-changing modifier sits above the selected row.
Collapse To Here or Paste gives odd results. These are the least tested parts, so try them on a duplicate of your object first, and save before you use them.
Modifier Stack is a bit experimental. Not every deformer has been tested in every order. If something breaks, email us what you did and which modifiers were in the stack.
Need help? Email support@LPTools.store and include the details listed on the Support page.